Inkscape tutorial: the bat
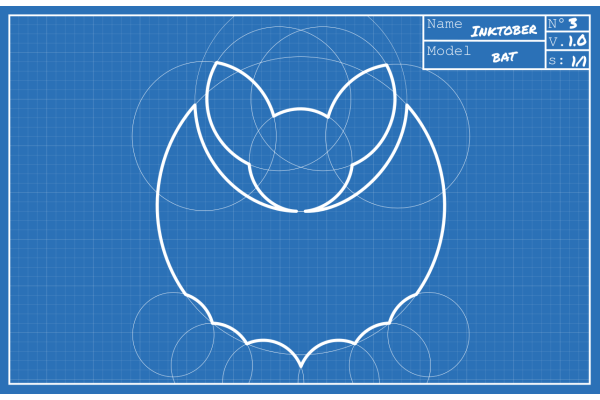
I decided to practice Inkscape, and since it's october I wanted to use the Inktober prompts as inspiration. Here is a short tutorial of how I drew the bat.
Inspiration
I decided to try and draw the blueprint of a bat, as some kind of technical drawing, and inspired by the design of some glyphs or logos that use well placed circles and lines to draw a logo, as in this source.
Looking for inspiration I found this picture and this one as a basis, color picked the blue background of the first and was good to go!
2 years ago, I had crocheted a bat designed by Yan Schenkel and used the model to shape the head.

Techniques
Color-wise, this drawing is very simple: one background blue shade, and white strokes.
Choosing the stroke width
To obtain a cohesive look, I chose the width for my strokes:
- The page size is
55x85mm, - The thin circles have a
0.2pxwide border, - The bat silhouette has a
1.7pxwide border.
The grid in the background was rendered using the Extensions -> Render -> Grid utility.
Drawing the silhouette
Once some circles are positioned, I duplicate them (Ctrl+D), and increase their border width. Then, with the Node tool (S), or the Ellipse tool (E) it is as simple as restricting the circle to the desired portion.

Once all arcs are drawn, I selected them and turned them into path (Maj+Ctrl+C) and combined them (Ctrl+K). That way, I have one path for the whole silhouette.
The last step is to merge nodes on each end of the arcs, because where two arcs touch, there are two very close nodes. Selecting those two node with the Node tool, there is the option to Join selected nodes in the top left options. I did so for each pairs of nodes and voilà!

Link to the svg
The svg file is available here.