Inkscape tutorial: crabby
Crabby monday... I am trying out another only circles drawing, a bit more rigorously than last monday's drawing. I am again inspired by one of Logos By Nick's video.
Inspiration
One of the difference with the bat drawing is that I will choose some circle sizes first, and then only use those to draw a logo. I decided not to go with the well-known Fibonacci sequence to have the size ratio of my circles:
- Choose a starting circle, with some arbitrary unit size,
- The other circles have some prescribed sizes with respect to the first,
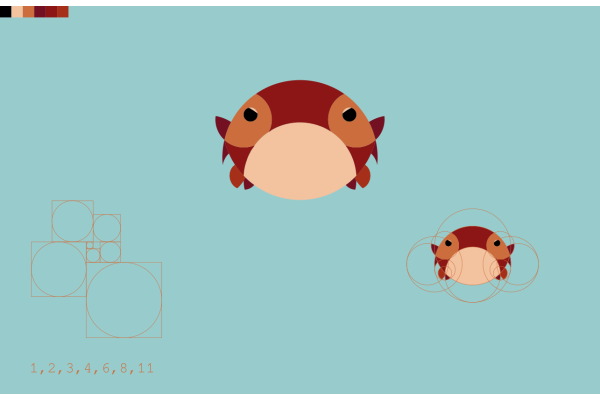
- The sizes go as follows: 1, 2, 3, 5, 8, 13, 21, etc (always add the two last numbers to get a new one).
Instead, I spend more time than I would admit in looking for a sequence whose ratios would approximate the square root of 2, and trying to have a nice geometric pattern to construct the circles.
I ended up not finding such a sequence... and just went with an integer rounding of the first powers of root 2: 1, 2, 3, 4, 6, 8, 11 (16, 23, 32, ...). And I constructed these circles trying to arrange them in a nice spiralling pattern. But those numbers don't come close to following a pattern as neat as the Fibonacci ones...
Techniques
Drawing the circles
To draw circles of appropriate sizes, I first drew bounding boxes with appropriate sizes: squares the would follow the same pattern in size. Once the boxes are constructed, juste take the Ellipse tool (E) click one of the corners and drag your mouse to the diagonally opposed corner. The resulting circle fits snuggly in its box.
With all circles drawn, I duplicated them and arranged them in a concentric pattern.
Arranging the circles
This is the meat of the procedure, but it was really trial and error. I can devise a procedure to reconstruct the crab:
Call the circles a to g from smallest to largest (a is 1, b is 2, c is 3, d is 4, e is 6, f is 8 and g is 11).
-
Body: Take f and g, and snap f's lower handle to g's lower handle.

-
Body: Take another g and snap its centre to f's upper handle.

-
Rear leg and brows: Take another f and snap its centre to the lower g's left handle, then take a e and snap its left handle to the previous f's left handle. Proceed symmetrically to the right.

-
Pincers: Take a b and snap its centre to where the upper g and the lower f intersect (right, and left), then take a c and snap its lower handle to b's lower handle.

-
Rear leg: Take a d and snap its lower handle to the previous c's upper handle. For the left eye, take an a and snap the lower left border of the bounding box to the upper left corner of the bounding box of the lower f.

From the circles to the logo
To get solid shapes from those circles, follow these steps:
- Turn all circles in path (
Shift+Ctrl+C) and join them (Ctrl+K) - Draw a rectangle that can cover the drawing
- Put the rectangle beneath the circles (
End), select the rectangle and the grouped circles - Divide the rectangle (
Ctrl+/)
What you are left with is a lot of shapes that you can delete if you don't need it, or unite with others (Ctrl++) to have the design you want!
Critiques
When I add the smaller shapes to have the crab body parts, I am sometimes left with artefact nodes in the middle of a shape. Maybe I did something wrong, or maybe Inkscape is a bit limited with precision cutting like this.
Additionally, the path have a lot of nodes. I tried simplifying them (Ctrl+L), which divided the number of nodes by nearly 6 while pretty much keeping the shape unchanged.
Link to the svg
The svg file is here